
安装kubernetes v1.18.2
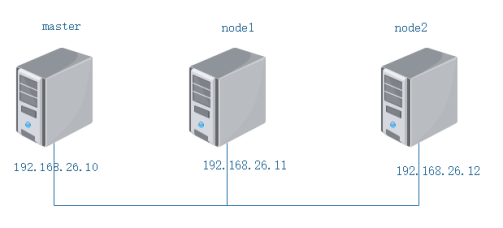
实验拓扑图

实验准备
在所有节点上同步/etc/hosts
[root@vmsX ~]# cat /etc/hosts
127.0.0.1   localhost localhost.localdomain localhost4 localhost4.localdomain4
::1         localhost localhost.localdomain localhost6 localhost6.localdomain6
192.168.26.10   vms10.rhce.cc   vms10
192.168.26.11   vms11.rhce.cc       vms11
192.168.26.12   vms12.rhce.cc       vms12
[root@vmsX ~]#
在所有节点上配置防火墙和关闭selinux
[root@vmsX ~]# firewall-cmd --get-default-zone
trusted
[root@vmsX ~]# getenforce
Disabled
[root@vmsX ~]#
在所有节点上关闭swap,并注释掉/etc/fstab里swap相关条目:
[root@vms10 ~]# swapon -s
文件名             类型      大小  已用  权限
/dev/sda2               partition   10485756    12  -1
[root@vmsX ~]# swapoff /dev/sda2
[root@vmsX ~]# sed -i '/swap/s/UUID/#UUID/g' /etc/fstab
在所有节点上配置好yum源(请提前安装好wget,再执行下面的操作)
[root@vmsX ~]# rm -rf /etc/yum.repos.d/* ; wget -P /etc/yum.repos.d/ ftp://ftp.rhce.cc/k8s/*
--2020-03-03 04:38:36--  ftp://ftp.rhce.cc/k8s/*
           => “/etc/yum.repos.d/.listing”
...

[root@vmsX ~]#
在所有节点安装并启动docker,并设置docker自动启动。
yum install docker -y
systemctl enable docker --now
在所有节点设置相关属性
[root@vmsX ~]# cat <<EOF >  /etc/sysctl.d/k8s.conf
net.bridge.bridge-nf-call-ip6tables = 1
net.bridge.bridge-nf-call-iptables = 1
net.ipv4.ip_forward = 1
EOF
[root@vmsX ~]#
在所有节点上安装软件包:
[root@vmsX ~]# yum install -y kubelet-1.18.2-0 kubeadm-1.18.2-0 kubectl-1.18.2-0  --disableexcludes=kubernetes
已加载插件:fastestmirror
Loading mirror speeds from cached hostfile
正在解决依赖关系
--> 正在检查事务
---> 软件包 kubeadm.x86_64.0.1.18.2-0 将被 安装
...
已安装:
  kubeadm.x86_64 0:1.18.2-0    kubectl.x86_64 0:1.18.2-0    kubelet.x86_64 0:1.18.2-0

作为依赖被安装:
  conntrack-tools.x86_64 0:1.4.4-5.el7_7.2    cri-tools.x86_64 0:1.13.0-0
  kubernetes-cni.x86_64 0:0.7.5-0    libnetfilter_cthelper.x86_64 0:1.0.0-10.el7_7.1
  libnetfilter_cttimeout.x86_64 0:1.0.0-6.el7_7.1  libnetfilter_queue.x86_64 0:1.0.2-2.el7_2
  socat.x86_64 0:1.7.3.2-2.el7

完毕!
[root@vmsX ~]#
注意:安装时如果没有指定版本则安装的最新版本。
在所有节点上启动kubelet,并设置开机自动启动:
[root@vmsX ~]# systemctl restart kubelet ; systemctl enable kubelet
Created symlink from /etc/systemd/system/multi-user.target.wants/kubelet.service to /usr/lib/systemd/system/kubelet.service.
[root@vmsX ~]#
安装master
[root@vms10 ~]# kubeadm init --image-repository registry.aliyuncs.com/google_containers --kubernetes-version=v1.18.2 --pod-network-cidr=10.244.0.0/16
W0402 10:33:13.618736    2065 validation.go:28] Cannot validate kube-proxy config - no validator is available
W0402 10:33:13.618767    2065 validation.go:28] Cannot validate kubelet config - no validator is available
[init] Using Kubernetes version: v1.18.2...

Your Kubernetes control-plane has initialized successfully!

To start using your cluster, you need to run the following as a regular user:

  mkdir -p $HOME/.kube
  sudo cp -i /etc/kubernetes/admin.conf $HOME/.kube/config
  sudo chown $(id -u):$(id -g) $HOME/.kube/config

You should now deploy a pod network to the cluster.
Run "kubectl apply -f [podnetwork].yaml" with one of the options listed at:
  https://kubernetes.io/docs/concepts/cluster-administration/addons/

Then you can join any number of worker nodes by running the following on each as root:

kubeadm join 192.168.26.10:6443 --token apysvc.hefwhwu1nkz7jil5 \
    --discovery-token-ca-cert-hash sha256:e843ff9b69d950e27f4d75669ec54028938033aeca872e06221fbf74a07d18b1
[root@vms10 ~]#
按上面的提示分别执行每条命令:
[root@vms10 ~]# mkdir -p $HOME/.kube
[root@vms10 ~]# sudo cp -i /etc/kubernetes/admin.conf $HOME/.kube/config
[root@vms10 ~]# sudo chown $(id -u):$(id -g) $HOME/.kube/config
[root@vms10 ~]#
上面的提示中,kubeadm join 192.168.26.10:6443 --token apysvc.hefwhwu1nkz7jil5 --discovery-token-ca-cert-hash sha256:e843ff9b69d950e27f4d75669ec54028938033aeca872e06221fbf74a07d18b1
是用于node加入到kubernetes集群的命令,如果忘记了保存此命令的话,可以用如下命令获取:
[root@vms10 ~]# kubeadm token create --print-join-command
W0402 10:46:06.340539    4988 validation.go:28] Cannot validate kube-proxy config - no validator is available
W0402 10:46:06.340608    4988 validation.go:28] Cannot validate kubelet config - no validator is available
kubeadm join 192.168.26.10:6443 --token oo90fm.9u2vmdd9nwcdagk6     --discovery-token-ca-cert-hash sha256:e843ff9b69d950e27f4d75669ec54028938033aeca872e06221fbf74a07d18b1
[root@vms10 ~]#
注意1:这里用--image-repository选项指定阿里云的镜像
注意2:如果想安装其他版本的话,直接在--kubernetes-version里指定:
kubeadm init --image-repository registry.aliyuncs.com/google_containers --kubernetes-version=v1.17.2 --pod-network-cidr=10.244.0.0/16
(当然要先安装对应的kubelet的版本)
安装calico网络
在master上,把上课用的两个calico文件上传上去:
把calico_v3_10.tar拷贝其他所有机器,然后倒入到docker镜像:
[root@vmsX ~]# docker load -i calico_v3_10.tar
在master上创建calico网络:
[root@vms10 ~]# kubectl apply -f calico_v3.10.yaml
configmap/calico-config created
customresourcedefinition.apiextensions.k8s.io/felixconfigurations.crd.projectcalico.org created
... 大量输出...
serviceaccount/calico-kube-controllers created
[root@vms10 ~]#
设置kubectl可以使用tab键:
编辑/etc/profile,在最后加上source <(kubectl completion bash)并使之生效:
[root@vms10 ~]# sed -i '$asource <(kubectl completion bash)' /etc/profile
[root@vms10 ~]# source /etc/profile
[root@vms10 ~]#
因为后期可能要复制yaml文件格式,所以设置编辑器vim的属性:
创建/root/.vimrc内容为下:
[root@vms10 ~]# cat .vimrc
set paste
[root@vms10 ~]#
配置node加入集群
在node11和node2分别执行
[root@vmsY ~]# kubeadm join 192.168.26.10:6443 --token apysvc.hefwhwu1nkz7jil5 --discovery-token-ca-cert-hash sha256:e843ff9b69d950e27f4d75669ec54028938033aeca872e06221fbf74a07d18b1
[preflight] Running pre-flight checks
    [WARNING Service-Kubelet]: kubelet service is not enabled, please run 'systemctl enable kubelet.service'
[discovery] Trying to connect to API Server "192.168.26.10:6443"
...
This node has joined the cluster:
* Certificate signing request was sent to apiserver and a response was received.
* The Kubelet was informed of the new secure connection details.

Run 'kubectl get nodes' on the master to see this node join the cluster.

[root@vmsY ~]#
切换到master上,可以看到所有节点已经正常工作了:
[root@vms10 ~]# kubectl get nodes
NAME            STATUS   ROLES    AGE     VERSION
vms10.rhce.cc   Ready    master   13m     v1.18.2
vms11.rhce.cc   Ready    <none>   9m58s   v1.18.2
vms12.rhce.cc   Ready    <none>   10m     v1.18.2
[root@vms10 ~]#
删除节点及重新加入
如果要把vms12.rhce.cc从集群中删除的话,执行如下命令:
[root@vms10 ~]# kubectl drain vms12.rhce.cc --delete-local-data --force --ignore-daemonsets
node/vms12.rhce.cc cordoned
evicting pod "calico-kube-controllers-74c9747c46-kv7dw"
evicting pod "coredns-9d85f5447-ptbqs"
pod/calico-kube-controllers-74c9747c46-kv7dw evicted
pod/coredns-9d85f5447-ptbqs evicted
node/vms12.rhce.cc evicted
[root@vms10 ~]#
[root@vms10 ~]# kubectl delete node vms12.rhce.cc
node "vms12.rhce.cc" deleted
[root@vms10 ~]#
[root@vms10 ~]# kubectl get nodes
NAME            STATUS   ROLES    AGE   VERSION
vms10.rhce.cc   Ready    master   14m   v1.18.2
vms11.rhce.cc   Ready    <none>   11m   v1.18.2
[root@vms10 ~]#
再次把vms12.rhce.c加入到集群,要先清除kubernetes设置:
[root@vms12 ~]# kubeadm reset
[reset] WARNING: changes made to this host by 'kubeadm init' or 'kubeadm join' will be reverted.
[reset] are you sure you want to proceed? [y/N]: y
..
If your cluster was setup to utilize IPVS, run ipvsadm --clear (or similar)
to reset your system's IPVS tables.

[root@vms12 ~]#
[root@vms12 ~]#kubeadm join 192.168.26.10:6443 --token apysvc.hefwhwu1nkz7jil5 --discovery-token-ca-cert-hash sha256:e843ff9b69d950e27f4d75669ec54028938033aeca872e06221fbf74a07d18b1

[preflight] Running pre-flight checks
[preflight] Reading configuration from the cluster...

...
Run 'kubectl get nodes' on the master to see this node join the cluster.

[root@vms12 ~]#
注:不管是master还是node,如果想清空kubernetes设置的话,需要执行kubeadm reset命令。
